Pepper Rootstock Amazonica can be used to grow your own rootstocks from seed onto which you can graft your own pepper and sweet pepper plants. The rootstocks grown from these seeds have good resistance to Tobacco Mosaic Virus, Tomato Mosaic Virus, and PMMoV (Pepper Mild Mottle Virus) PMMoV-2. Pepper and sweet pepper plants grafted onto this rootstock develop a stronger root system, produce less foliage, and yield more fruits. Thanks to this rootstock, the plants achieve a good yield, grow taller, have less foliage, and produce more fruits. The fruits also grow faster than usual. Use tomato grafting clips to secure the plant to the rootstock.
The advantages of grafting include a longer growing period. Due to the stronger growth vigor, you can harvest larger and more fruits. You can also graft the plants yourself, which is more economical than buying grafted plants. When grafting yourself, you can also choose which variety to use. Preferably use F1 rootstocks, as they possess all the desired disease resistances.
Indoor sowing: January - March
Germination temp: 25 30 °C
Germination: 10 - 21 days
Sowing depth: shallow - ½ cm
First sow the rootstock peppers in the usual way. Use small pots filled with moist potting soil. Sow one seed per pot superficially on the soil. Gently press the seeds down. Keep the temperature as stable as possible. Make sure the temperature does not drop at night. Place the pots in a heated room or in a propagator with a lid and heating. Also ensure sufficient light. As soon as the seeds germinate, you can remove the lid.
Approximately 14 days after the rootstocks have germinated, you can graft the peppers or sweet peppers onto a rootstock. This can be done quite easily yourself. You can graft peppers and sweet peppers because this results in a larger harvest and better resistance to common diseases. You can also graft to grow special and unique plants.
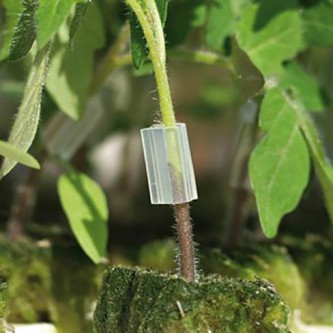
Here is an easy and simple method for grafting peppers or sweet peppers. You will need an upper trunk, a rootstock, a sharp knife and a tomatograftingclip. Both plants are bound together and this also keeps the root systems connected until the wound has healed. It is important that the diameter of both stems is the same.
The rootstock and the uppertrunk must both be cut diagonally with a sharp knife. Make sure both cuts are the same depth so that the connection is firm. This connection between the two plants is enough to take advantage of the beneficial properties of the rootstock. The rootstock provides extra vigor, resistance and fruits.
Cut the rootstock at about 10 - 15 cm. Make a cut down to about half the thickness of the stem. At the top trunk this will be a cut upwards to about half the thickness of the stem. Make diagonal cuts so that the two halves can fit together better. Make the cuts the same length as well. Do not cut too far as this will cause the plant to die. Then carefully slide both parts together. Press them gently. Make sure the parts fit together properly. That ensures a better result. Work as accurately and quickly as possible.
Connect the grafting site with a special tomatograftingclip. This ensures that both parts are well connected and cannot slide. Leave the clip in place. The plant has no further problems with this. The root systems are put together in a pot. Place the grafting plant in a cool, quiet place without direct sun for about 7-10 days. E.g. in a shed, garage or indoors. After about 10 days, the adhesion is so strong that the plant can be placed in its permanent place. Stick stakes near the plant to support it. Remove the tops from the plants. This causes new shoots to grow from the axilla of the plant. These shoots will carry the fruits. After this, the plant can be placed in its permanent place outside (sheltered) or inside a greenhouse.